
I started this gown around December 14, and I’ve even amazed myself that I finished it in just a little over a month, and with a week to spare before I’ll be wearing it for the Riverside Dickens fashion show. Granted, I am retired, but everyone knows you really ARE busier after you retire, and it’s true. I also have a hard time keeping my nose to the grindstone when so many other things are calling to me.
I had a few problems when I used sleeves from one pattern company that had the shorter bell shape that I wanted for my other pattern. This is a closeup of the sleeve from the Butterick 6694 that I used.

I rounded the edges off so I didn’t have the points but the more I look at this pattern, the more I like the points on both the sleeves and the bodice. Oh well, next time.
The sleeves on this pattern fit higher than the ones on my Simplicity 3855 pattern so there was a lot of poofiness on the top of the sleeve cap. The Simplicity had a dropped sleeve cap that went 5” down my arm, where this one only went down 2”. In the end, I cut off the extra 3” on the shoulder of the bodice and it went in easier. It still has a little uneveniness but it was acceptable. I’m not a perfectionist, and if it works, I’m happy. Or just lazy.
And look! The plaids match! After reading an article by Diane Yoshitomi on Your Wardrobe Unlock’d http://yourwardrobeunlockd.com/ about matching plaids, I paid more attention to doing that. *Disclaimer- the skirt fabric's third panel doesn't match because I didn't have enough fabric to correct that.*


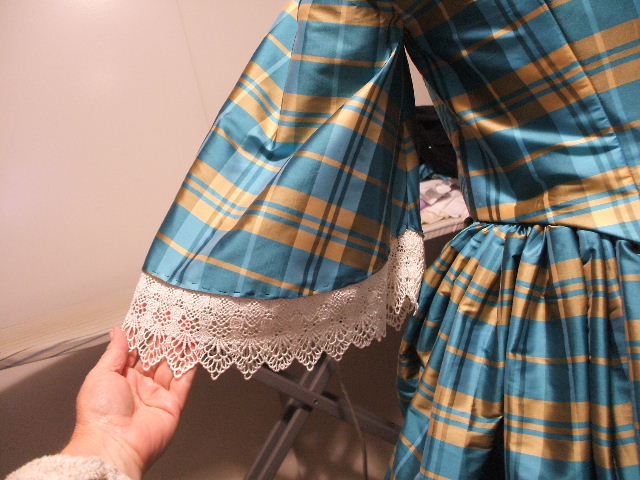
With only a month to make the gown, I didn’t have time to make new set of pretty undersleeves for this. I wanted to have a layer of lace on top of the cotton undersleeve, so I sewed a wide lace trim to the bottom of the sleeve cuff. I do have a plain pair of cotton undersleeves I can wear for now but eventually I want to make a softer prettier pair.
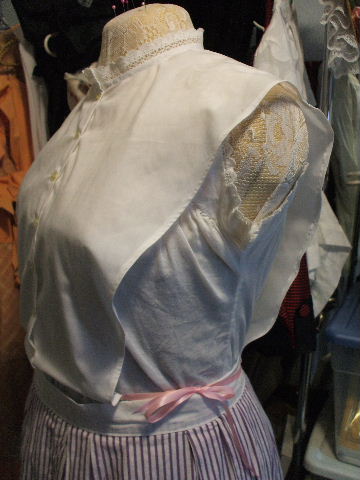
Once the bodice was pretty much constructed, I made up the little chemisette that comes with the Simplicity pattern. It was simple and quick, only taking me 4 hours to make. The waist is a bit too long for me, since I didn’t even think of checking the fit but since it does under the bodice, that will never be seen. A simple correction will just require turning the bottoms up farther for a new ribbon channel. I used a fine cotton for the chemisette, vintage mother of pearl buttons, and a cotton crocheted lace on the neckline.

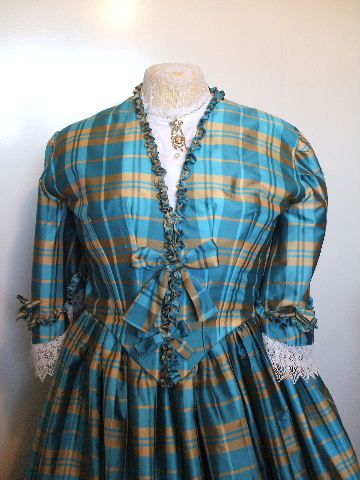
And we must have trim! Lots of it! I made a 1” wide ruffle from the plaid fabric, machine gathered it, and sewed it around the neckline and down the front by hand. Then I went around the cuffs. Ok, stop me now.


I made one big bow to pin at the bottom of the V front. Then a friend suggested a second smaller bow just below it. I also made a set of the smaller bows and put those on the sleeves just above the ruffle.
My skirt was just 3 panels of my 60” wide fabric, and cartridge pleated to a narrow self fabric waistband. For this show, I’m wearing a tulle crinoline petticoat for the fullness, with a flounced cotton petticoat over it. Later I want to make a corded petticoat to wear instead. I had one but it didn’t have the fullness this skirt needs.
My accessories will be an antique brass Victorian pendant with a small cameo on it, and my navy blue bonnet made by Mela Hoyt-Hayden from her Young Victoria collection. I’ll be wearing a white lace day cap under it. Tomorrow I have an appointment with a hair stylist who is going to style a long straight wig into a proper hairstyle of the era for me. She’s as excited as I am.


Last night, and with only 4 days to spare, I finished the gown. Of course I’m already wanting to tweak a few things, but that will have to wait until after this weekend. And now I can start on the black mourning version of this pattern.


No comments:
Post a Comment