
January 22, 2010
For my 1860s olive green gown I made to wear at the Riverside Dickens Fair, I wanted to use a straw bonnet with it, trimming it up inside the top of the brim, and some kind of fancy trim around the crown. This was my inspiration I used.

I wanted to have the high point at the top like a spoon bonnet instead of being rounded, so I placed a medium gauge millinery wire along the edge before I bound the edges. After it was sewn I bent it to the shape I wanted. *Test the strength of your wire to see if it will hold the shape*. First I sewed the millinery wire around the inside edge, using a wide zigzag stitch over it with my sewing machine. As long as you sew slowly, you shouldn’t have any problems. Then I pleated an antique white silk taffeta to go inside the bonnet, and pinned it in place to get the fit right. Line it up with the outside edges of the bonnet, with the excess down in the middle. You can trim off the excess. Make a round disk of the same lining fabric and turning the edges under, sew it on top of the raw edges at the bottom.


I machine-sewed a strip of the same fabric on the outside of the edge, then turned it over to the inside, and slipstitched it on by hand. I forgot to take a photo of the bonnet after I sewed and turned the edge over to finish the front. I slipstitched it to the inside lining.


I dug through my collection of millinery flowers that I find at antique shows and put a couple bits together for the upper brim. I basted these on. For the outside trim, I made a brown ribbon using a 4” wide strip of silk taffeta folded in half and sewn, closing off the ends at an angle, and leaving a bit open in the middle to turn it inside out. The finished width was 2”. Make it long enough to go around the top and then hang down on each side so you can tie it in a bow under your chin. I hand-tacked it through the straw frame, and decided I didn’t care that the stitches showed through on the inside & they wouldn’t show anyhow. *This could be done prior to lining it if you think of it in time.*


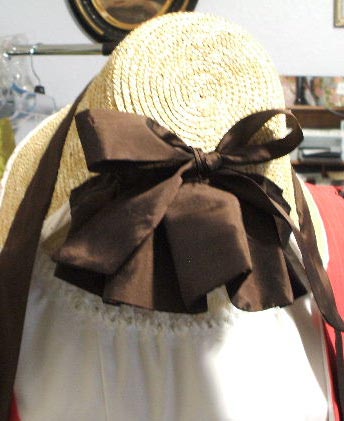
For the bavelot and bow on the back of the bonnet, I sewed more strips of the brown silk taffeta, similar to how I did the ribbon, but made the bavelot portion wider, about 8” which was folded in half. I hand-stitched these to the back of the bonnet along the lower edge. I made a pleated ribbon to go on top of the ribbon already sewn on by using a 4” strip & turning the edges under and towards the center so it had finished outside edges. The finished width was 2”. I machine-sewed down the center to hold them together. Then I tacked them down in the center through the bonnet frame.

For my side trims, I used some more of my millinery trims and sewed a sprig on each side and put small bows at the base of each one, this time using regular brown ribbon. At each point at the bottom of the bonnet, I sewed a narrow ribbon to tie under my chin, in addition to the regular bow to hold it in place better. Besides helping the bonnet holds its shape better, it also keeps the stress of your regular ribbon so it doesn’t untie as easily.


Here was the photo taken of me when I first wore it in Riverside 2010.
No comments:
Post a Comment