AKA Piping for Dummies:
I started a new costume a few weeks ago, an 1850s gown, and it will be my first attempt at doing piping. I tried doing it a few years ago, and never figured out how to get in between the fabric and the facing where it was just a narrow cord showing. Later I did a fake piping as trim along the edge of a sleeve jockey, my collar, and cuffs by sewing my silk taffeta trim right sides together to the edge of the fabric with a narrow hem. Then I turned it over to the inside and sewed a tiny hem to the back. I was basically just covering the edge of the fabric but from the front it looked like a nice narrow piping. You’ll probably remember this from an earlier post when I made my 1860s olive green gown.


For my 1850s gown, which I’m recreating from an original, I wanted to do it correctly as the pattern indicated. I already knew how to make bias strips from my fabric, and cut several lengths of it using a ruler that was 1-1/4 inch wide. After asking my friends on LiveJournal for suggestions to use for the cording, the overwhelming popular one was Lily Sugar n Cream 4 ply cotton yarn. I happened to have a few rolls of it from using it on a corded petticoat.Michael's carries this.

I folded the bias strip in half and placed the length of yarn down the middle, and secured it at one end with a straight pin. To keep the edges even, I pinned it down the length of the fabric. I used a zipper foot and sewed it as close to the edge of the yarn as I could. I even let the foot go slightly onto the top of the yarn to get it closer. For instructions on how to do this, I pulled out my copy of Cloak & Corsets “Modern Sewing Techniques for Historical Clothing Construction”, and found the chapter on piping. It had enough information to guide me through the next steps. http://www.cloakandcorset.com/products.php


I pinned it to the right side of my bodice with the half inch portion of the bias strip even with the edge of my bodice & basted it to hold in place. In this case, my seam allowances are a half inch, and I was sewing it around my arm hole & shoulder seams. On the armhole I started and ended it under my arm at the side seam. I overlapped the ends and pinned the loose ends up into the seam allowance so they crisscrossed. Later I trimmed those ends off even with the seam.


When I sewed the seams together I sewed the piping again using my zipper foot, and kept it close to the yarn. I thought this was going to be hard getting it exact but with my silk taffeta I can actually see the bump made by the yarn. You can also feel it. And you do want to get it close so the piping isn’t flopping around outside the seam.

Then I sewed the sleeve on as usual, making sure the edges were all even so my half inch seam would work. Here you can see the armhole piping. You can’t see the shoulder one since the seam is towards the back but it’s there. And once I got the hang of this, I didn’t stop. I decided to do it along the bottom edge of the bodice too. There are some other seams on the bodice that will be getting piping also.


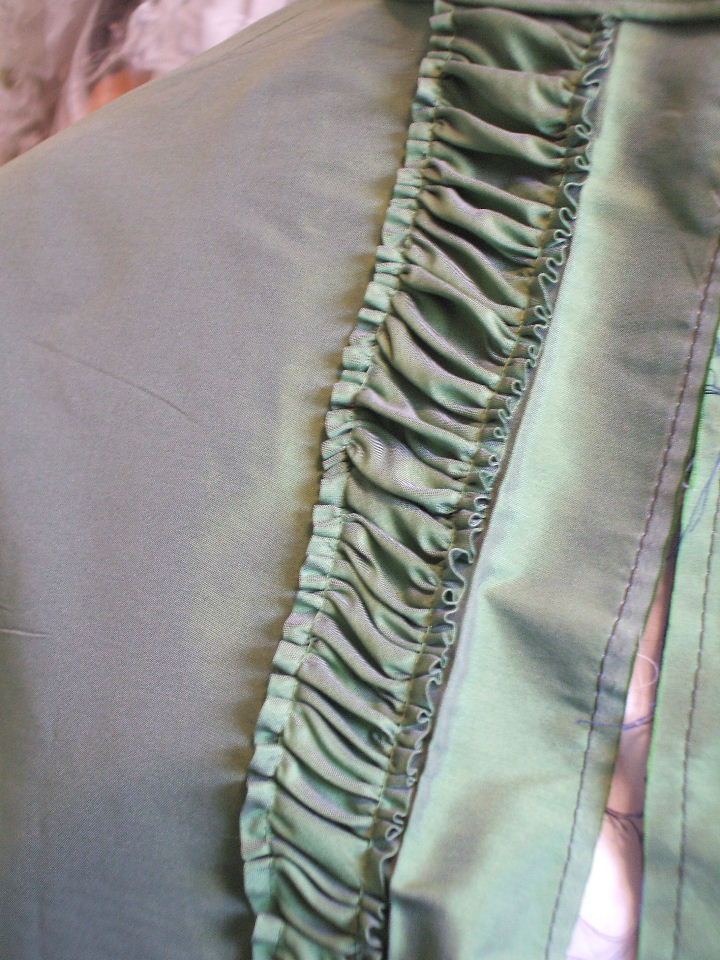
And THEN I got to try a different method of making ruching to trim the front of the bodice. My method as shown in my earlier 1770s gowns, was to turn the edges of the strip of fabric to the center and press, then gather it down the center, so it was ruffley on the edges. This gown does it different. The edges are turned under 1/4 inch on the sides, and gathered down BOTH sides so it pleats it down the middle. This photo shows the sewn edges on the strip on the top with a gathering stitch. The bottom one has it gathered up and pinned to the bodice. I hand sewed it using a basting stitch with only a small stitch showing on top down the stitch lines on the sides.

The first strip I sewed on the bodice has the gathers not level enough so I’m going to take out some of the hand stitches and even it out a little more. But I learned something new and now have a new trim technique to add to my skills.
No comments:
Post a Comment